How To Make A Simple Calculator Using HTML, CSS and JavaScript
 |
| A Calculator |
Hey guys, welcome back! Today, I'm going to be teaching you guys how to make a simple calculator which performs basic math operations such as addition, subtraction and so on with just HTML, CSS and JavaScript. This tutorial is designed for people who may have just finished learning the basics of HTML, CSS and JavaScript and wish to create a project which uses all three for optimum functionality.
Prerequisites
You don’t need much to be able to follow along with this tutorial. You
just need a text editor; this could be Notepad,
Sublime Text or Visual Studio Code. For this tutorial, we’ll use VS Code. If you
already have a text editor, you can use that as well. If you don’t, go ahead
and download it from the official site (the steps to install VS Code can be found in our JavaScript tutorial for beginners).
Moving on, the next thing you need is the basic understanding of HTML,
CSS and JavaScript. By ”basic understanding”, I mean you should be able to at
least write some programs in these languages individually without needing to
look at a tutorial or something. If you’re an absolute beginner (you have no
idea of what any of this means), be sure to check out my HTML, CSS and
JavaScript tutorials for beginners. The links are at the end of this post.
NOTE: I’m not going to
go into details of how to use HTML to make a form or CSS to style the HTML or
how to create a function with JavaScript as they have already been discussed in
detail in our previous tutorials. I recommend you checking those out FIRST
before attempting this project. You can get the tutorials for each of these
languages by following the links at the end.
If you have the above-mentioned things ready, then you’re all set to
start coding; so without further ado, let’s dive in!
HTML
First of all if you want to make a calculator with HTML, CSS and
JavaScript; you’re going to need some kind of a host for the CSS and JavaScript
because CSS needs to be included in an HTML file for it to be rendered. JavaScript
on the other hand need not be included in the HTML for it to be run, because
browsers have a program which is known as a JavaScript engine which executes
JavaScript codes.
We however need to include JavaScript with our HTML because we want to
calculate, let’s say some expression a user entered on our imaginary website.
Whenever a user opens a web page, what they interact with is the HTML. That’s
why we need an HTML file for this before we go any further.
(I’m going to assume that you have already installed Visual Studio Code
or you have opened up your text editor. If not, please do that.)
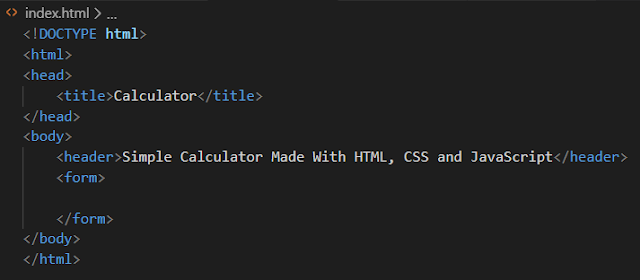
First, create an HTML file in your text editor and type in some HTML
codes. These codes are the document declaration (<!DOCTYPE
html>),
the opening and closing <html> tags and the
opening and closing <body> tags.
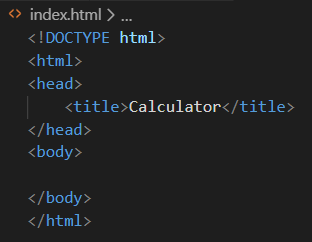 |
| Basic HTML Structure |
Now the HTML is going to be simple. We want like a big header with some
text like “This is a calculator” or something, and then we want three fields –
two for the numbers we want to calculate and one for the operator which can
either be addition, subtraction, multiplication, division or exponentiation.
All these fields would be filled by our user so it’s kind of like a form which
we can nest within our <form> tag.
The next step is to include the fields for our form using <input> tags. Normally I
like to have my HTML open in a browser as I code so I can like see the output
almost instantaneously. It’s not required; it’s just something I like to do.
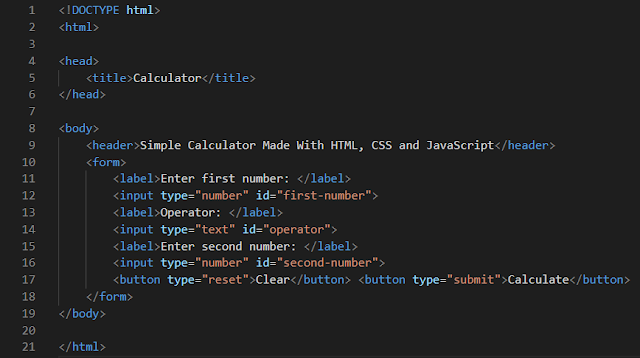 |
| The Complete Layout For Our Calculator |
 |
| The HTML file In A Browser |
You can see that our calculator has taken shape. It however
looks ugly with the fields spanning across on a single line. We can fix that
with CSS and we’ll do that in a second. Now, let’s finish up with our HTML by
adding classes and IDs where they’re
necessary so we can grab on to these elements from within our CSS and adding a
few other things here and there.
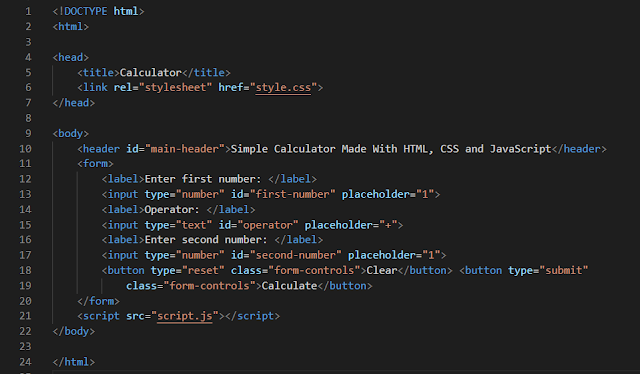 |
| The Finished HTML |
 |
| The HTML In A Browser (no visible change) |
Lines 6 and 21 reference our CSS and JavaScript files respectively;
both of which are in the same folder with our HTML so a relative
path
is used. We’ll work on these files in a few.
And we’re done with the HTML. We have our calculator’s “skeleton”. Now
we need the “muscle” (JavaScript) to make it functional.
JavaScript
Now that we have the body for the calculator, let’s write the brain for
it. We want our program to get the values of each number in the fields on lines
13 and 17; do the operation for the operator entered and return the result to
the user when the user clicks on Calculate.
All the code for this is then put inside of a function which would be
called when the user clicks on “Calculate”. So enough theory, let’s see it in
action.
 |
| Action! |
First, create a new file and call that “script.js”. It can be called
anything really but the .js is necessary.
Next in this file, create a function which takes no parameters. All the
variables we’ll be making use of would be defined within this function.
(A function is defined in JavaScript using the function keyword
followed by the name of the function, a pair of parentheses and a pair of
curly-braces.)
 |
| Defining a function in JavaScript |
The next thing to do is to create variables which would hold the values
of the numbers and operator entered by the user. This can be done by using the document.getElementById().value function. This
function gets the value of whatever element which has the ID we specify.
Remember we gave each of our <input> fields an ID, so
we can pass this as a string-argument to this function and get the value of
whatever the user entered. I’ll also create two more variables which I’ll explain
their purpose(s) in a bit.
 |
| Defining variables within our calculateNumbers() function in JavaScript |
Now that we’ve stored those values in variables in our JavaScript, it’s
easier to work with them now.
The next step is to create a switch-case statement which we’ll use
to check if the operator entered by the user is either an addition, subtraction
and so on. This can be done like this:
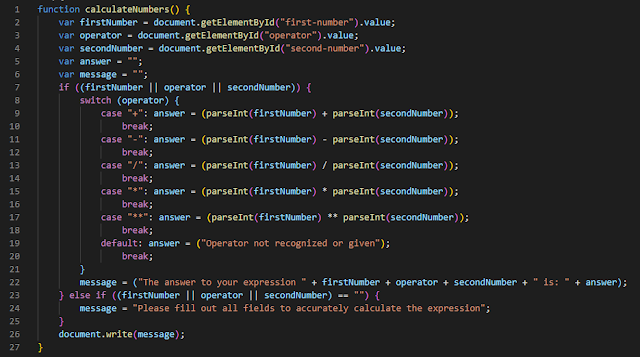 |
| The entire JavaScript code needed |
We added those two variables, answer and message so that it is
easier to print out the result of this whole function. Now, I’ll explain what
each line does.
Line 7 checks if either one of the fields is not false, in other words it is not an empty string (no input
entered). If all fields were entered, we enter into our switch-case
block
which checks if the operator variable holds either an addition, subtraction,
multiplication, division or exponentiation sign. If that evaluates to true, we set the answer variable to be
the result of the firstNumber +
operator + secondNumber. For example:
var
firstNumber = 5;
var
operator = “+”;
var
secondNumber = 6;
Then answer would be: 5 + 6, which is 11. (JavaScript
automatically calculates expressions for us.)
The parseInt function we called
converts a number in string form to a number. More accurately, it converts its
type from a string to a number so we can work with it as we would work with
numbers normally. We called this function because user input is always stored
as a string.
Then outside our switch-case block, but still in our
if
block;
we set the message variable to be: “The answer to your
expression is ” + answer. That is, we’re taking that value
we got from calculating the numbers which is stored in our answer variable, and
we’re adding it to a sentence so it’s easier to understand where that figure is
coming from.
Now outside that if block, we check if either one of the
fields were left blank (are empty strings). If we find at least one field which
is blank, we set the message variable to be “Please fill out
the form properly”.
Outside of the if and else if blocks, just before our
function ends; we print the value of our message variable in the
document, so we can see the output.
And we’re done with our JavaScript function. We are however missing
something. We haven’t told our HTML to call this function once the Calculate button is
pressed. We can add that by doing this:
| Adding an onclick attribute to our submit button in the HTML and referencing the calculateNumbers() function in it |
Now when we click on “Calculate”, our program should work as we want it to. Let’s find out.
 |
| Test I |
Yes! It worked. Let’s try another example.
 |
| Test II |
 |
| Result of Test II |
CSS
Now you can really go bananas with this because CSS is
all about design and the way I design my HTML might not be the same way you do
yours; especially if you’ve already done some projects with HTML and CSS.
I’m going to do this CSS for those who may have not
been introduced to CSS; I however implore you to check out my CSS tutorial for beginners if you’re completely new to CSS. Without further ado, let’s get
started.
First create a new file and call that style.css. In this file; we’re going to define
all the styles we’re going to use for this calculator.
I’m going to show you guys the finished product after
all is said and done and then show you guys the codes to write to get that
finished product; so we have kind of like a destination which we’re heading to.
 |
| The Finished Product |
Pretty neat right? You too can do something like this by typing the following codes in the new CSS file you created.
And that’s it! We’ve made a simple calculator using
HTML, CSS and JavaScript. For more tutorials like this and more; be sure to check back on us.
You can attempt to do this on your own and if you find
yourself stuck, remember that we’re bound to hit obstacles along the way as
programmers and computer professionals, but the only way to truly learn and
master coding is to practice everyday. Remember, “practice makes perfect ”.
Any complaints, requests or suggestions should be sent via email to us. You can
alternatively send us a message on our Facebook page
and join our Facebookgroup. We appreciate your feedback!
Links.
·
Go to the HTML Tutorial For Beginners.
·
Go to the CSS Tutorial For Beginners.
·
Go to the JavaScript
Tutorial For Beginners.
For
all the lazy bones out there who may not want to continually switch from reading
this tutorial and writing the codes; you can download the source code here. You can also download the offline e-book here.
NOTE:
I modified the HTML to give the calculator a more appealing interface. The change is visible in the source code.
And
on that note, we’ve come to end of this tutorial. I hope you liked it. Be sure
to check back with us soon.
Happy Coding!




This comment has been removed by the author.
ReplyDelete